Larch Madness: The Premier Hiking Spots in Washington State to See Yellow Trees
Yellow trees!
It’s the most wonderful time of the year! Fresh hop beers, puffy coats and Larches!
Let’s go hiking!
Best Larch hikes in WA
I’ve lived in the evergreen state for nearly my whole life. Though there are beautiful deciduous trees that do turn, Washington was never really known for its fall foliage. But, along with the rise of fresh hop beers, Octobers in the PNW has become the center for a new type of hype, the Larch Madness. Unlike its collegiate springtime brethren, Larch madness is the few weeks where certain hikes are inundated with hikers from all around, coming to view these beautiful trees in their stark beauty as they shed their needles before the cold of winter arrives.
I love larches. I think they’re so beautiful. So much so, that I actually named my son Nico Larch, after the trees. It’s such a wonderful time of the year to be out hiking because it’s beautiful, the temperature is great and sunrise/sunset are actually at reasonable times. You really can’t top a hike during Larch Madness.
That said, there is a lot of misinformation about the hikes to get to see the larches. If you do a quick search, you’ll quickly find blogs with similar lists to this, but that really does a disservice to the hikers because they’re written by AI and don’t truly understand the landscape. So, I’m going to do my best throughout this list to be brutally honest about the hikes. I will update if I’ve actually done a hike or not. I want to make a guide that really helps you make choices that will help you see these beautiful trees but also enjoy every step along the trail as well.
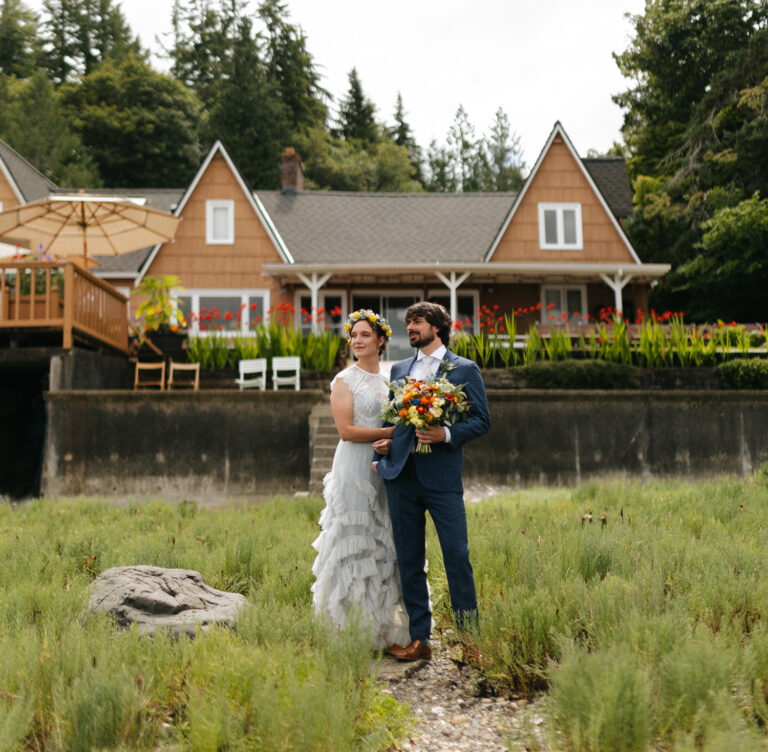
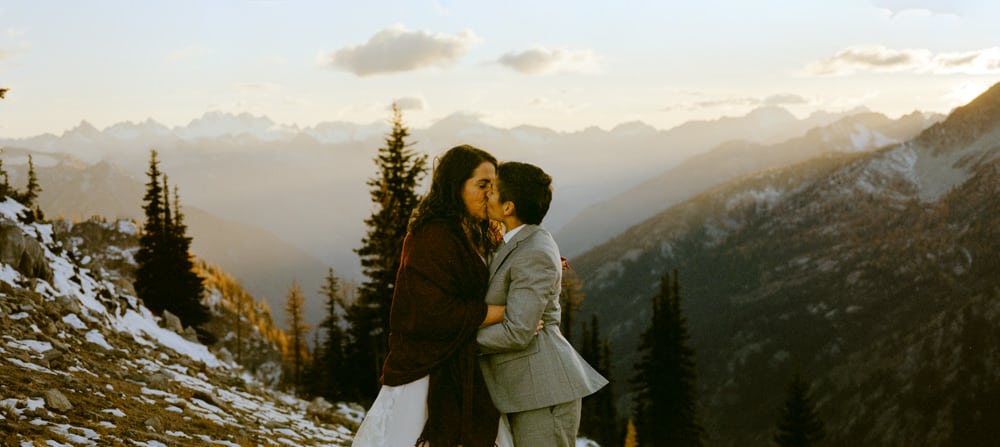
Elopement and engagement notes
I am a wedding and elopement photographer. So, if you’re reading this blog and have the thoughts “Hey, it’d be kinda cool to elope under these larches” or “Larches could be a really rad backdrop for our engagement photos,” just say hi. We can chat about how to make magical photos together that celebrate your relationship and the nature around you.
What is a Larch?
A larch is a deciduous conifer. Usually, conifers are evergreens, but this is one of the few that changes colors and loses its leaves. There are a variety of specific species, but here in WA, we generally have the Western Larch or Larix occidentalis. This type of tree generally grows above 1500 ft (but it’s kinda rare to find them that low) and below 7500 ft above sea level. They also like soil that drains well. This is why you won’t often find them in boggy areas, but rather on hillsides that allow for water runoff.
The tree grows faster than other conifers of its size and is very fire-resistant. However, in the current climate change, the mega-fires that we are experiencing are still dangerous to these trees. The needles are soft to the touch, especially during their color-changing season.
For more information about Larches (and elopements), I was featured by CBS Sunday Morning about them.

When is the best time to see larches?
The best time of year to view larches is when they’re in their yellow form. That usually is somewhere between the middle of September through the middle of October in Washington state. You will see the larches change sooner at higher altitudes and more northern latitudes. So larches near the British Columbia border will probably turn sooner than ones you’ll find near White Pass (south of Tahoma).
Note: I attempt to call Mt Rainier by the name generally accepted by Washington’s first peoples, which is Tahoma. There are many variations and spellings of this, but this is the generally agreed-upon spelling for English speakers.
If you’re hiking during Larch Madness, I’d suggest starting early or staying late. If you start a hike at 9 am on a weekend, there will be a lot of people on the trails. But if you start at 5 am or 3 pm (with the proper gear obviously), you will find more solitude.
When is Larch Madness?
Larch Madness is the 2-week peak of Larch color in the North and Central Cascades. This usually occurs in the first two weeks of October. It can vary a little from year to year depending on the temperature and drought levels. This is when you will find larch-related hikes to be most popular with hikers.

The best larch hikes in Washington
Below is a list of hikes to larches. These are some of the most spectacular hikes in all of WA. I want to have a list here that gives you all the details you need to make good choices about what is going to be the most fun for you. I’ll attempt to include links with driving directions. I’ll also include a difficulty rating. I’d consider these based on difficulty for an active adult who works out a few times a week.
I will also put my own commentary on the various hikes in italics.
Note: if the driving directions include time on dirt roads or forest service roads, expect to actually take more time than what Google Maps says. Most WA roads are possible for all vehicles, but some can be very rutted out and therefore will slow you down A LOT.

Blue Lake
Distance: 4.4 mi round trip | Elevation gain: 1050 ft | Drive time from Seattle: 3:00 hrs | Pass Required: Northwest Forest Pass | Difficulty: moderate
Have I done it: Yes
This is one of the most popular Larch hikes because it is fairly easy. There is a medium-sized parking lot, but also lots of shoulder parking along the highway. You’ll begin with a little over a mile of wooded climbing. You then will find yourself amongst some of the lower-level larches as the forest begins to thin and you’ll have views across the valley. You will also see the cliffs of Liberty Bell behind you.
When you reach the lake, there is a small trail to the left, but the real views are to the right side of the lake. There is a big rock that is a great spot to sit for lunch (or get married). You’ll have great views of the wall of larches on the opposite shore with the high cliffs beyond. Be sure to do the small loop that continues above the rock as well. Though it’s a bit more hiking, the incredible views of Liberty Bell, a small high pond, and the surrounding valley are totally worth it.
Pro tip: Start in the late afternoon and stay through sunset. Though you don’t really see the sunset, the colors on Liberty Bell are truly spectacular. Then, it’s a pretty easy hike out under headlamps (BRING YOUR HEADLAMP affiliate link).
Things to be aware of: The trail for this hike is on a north-facing slope. That means in October, much of the trail will not actually be touched by the sun. If any snow has fallen recently, this trail can get very slippery because there is only daylight temperatures to promote melting and then frequent re-freezing. If it has snowed recently, I would consider bringing micro-spikes. I’ve used these for years and really like them (affiliate link).
Maple Pass loop
Distance: 7.2 mi round trip | Elevation gain: 2000 ft | Drive time from Seattle: 3:00 hrs | Pass required: Northwest Forest Pass | Difficulty: Hard
Have I done it: Yes
This is another one of the most popular hikes in WA for larches. You might even be here because you’ve seen photos from the top of the pass looking back on Lake Ann, with its little island and the peaks beyond. With good reason, this is incredible. This was one of the first hikes I’d ever done with Larches and it was a morning that truly blew my mind and changed the way I view the mountains surrounding me.
You can go either way around the lake and up the pass. Some folks prefer to go counter-clockwise from the parking lot because it’s a more gentle slope. You will spend a lot of your uphill looking at the Lake Ann basin before you begin switchbacks up to the pass itself.
You can alternatively go clockwise which is a shorter/steeper trip to get up to the high point. That will give you views over into the neighboring Rainy Lake basin. Both are beautiful and it’s simply up to you.
Personally, I prefer to do my hard hiking first. So I would prefer to go clockwise and then have a more gentle downhill back to the car.
The Enchantments
Distance: 18 mi round trip | Elevation gain: 4500 ft | Drive time from Seattle: 3:00 hrs | Pass required: Northwest Forest Pass | Difficulty: Very Hard
Have I done it: Yes
The Enchantments are so aptly named. They are an enchanting and truly magical space. They are hard to get to, but worth the effort to bask in their glory and natural beauty. Enjoy the beautiful teal waters of Colchuck lake, the stark steepness of Dragontail Peak, the high alpine valleys, glacial tarns, and magical larch playgrounds of the central core. It is one of the most beautiful spots on earth.
It should be said, you cannot camp in The Enchantments unless you have a permit. Every February, the lottery opens. These permits are quite difficult to get. You can also go to the ranger state in Leavenworth the day of your hike and attempt a walk-up permit. Obviously, there are no guarantees about this, but if you’re flexible, this is a much more likely way to obtain a permit than the lottery.
With popularity, comes other troubles. This is a VERY fragile area and every year, more and more people go up into the core. There are so many folks who do the day hike now that it is becoming increasingly important to stay on marked trails and to walk on rocks when possible. Take care of this area or else we may see a future where we’ll need permits to hike as well as to camp in the core.
I have done the through hike in both directions. I don’t think that one is easier than the other. Going up Asgard pass is hard, but honestly, just keep slogging along and you’ll eventually make it. In my route planning, I would spend more time considering your descents. If you go counter-clockwise (starting at the Colchuck trailhead), you will have to go up Asgard, but then follow the trip out from Snow Lakes down to the parking lot is a never-ending slog. Conversely, if you start at Snow Lakes, you have more vertical change and you have to descend Asgard. If you have ankle issues, I’d be very wary of descending Asgard as well as if you think there is a possibility you could have to descend in the dark.
Lake Ingalls
Distance: 9 mi round trip | Elevation gain: 2500 ft | Drive time from Seattle: 2:30 hrs | Pass required: Northwest Forest Pass | Difficulty: Hard
Have I done it: Yes
Lake Ingalls is another very popular Larch hike. It’s a little closer to Seattle (and much closer to anything in the South Sound) than the North Cascades options. After a nice drive up the valley, you’ll have a few miles of climbing and sweating. But, you get your climbing mostly out of the way early. Once you cross the Ingalls Pass, you’ll get to walk under and around thousands of yellow beauties as you make your way around to the lake itself.
Pro Tip: if you only care about Larches, you don’t need to go all the way to the lake. The lake itself has no vegetation. It’s still beautiful and has a great view of mountains, but if you’re only in for the yellow trees, you can stop in the basin after Ingalls Pass.

Lake Ann
Distance: 8.2 mi round trip | Elevation gain: 2200 ft | Drive time from Seattle: 2:30 hrs | Pass required: Northwest Forest Pass | Difficulty: Hard
Have I done it: No
How many Lake Anns are in Washington? That and Snow Lake. It’s confusing. Anyway, don’t get confused with the Lake Ann that is in the middle of Maple Pass loop. This is a side hike that starts from the same area as the Lake Ingalls trailhead. But, it’s not as famous. So, we were here before it was cool. (or so I’ve read) There are still lots of larches and fewer people. That seems like a win-win. You climb around the western side of Ingalls Peak. Enjoy the tranquility, for now. Sorry if I’m ruining it.
Pro Tip: be a badass and do both Ann and Ingalls in a day. I double-dog dare you.
Grasshopper Pass
Distance: 9 mi round trip | Elevation gain: 1200 ft | Drive time from Seattle: 4:30 hrs | Pass required: Northwest Forest Pass | Difficulty: Medium
Have I done it: No
Holy moly this is on my to do list. I haven’t been so turned on by a WTA page in quite a while as when I first found this trail report. It is long, but not crazy elevation gain. But to get such a magical mix of fall colors in ground cover with Larches? What is the catch?
The catch is the drive. OMG. It’s so far away. You’re looking at 10 hours in a car from Seattle round trip. I want to go there, but only when I’ll have time to go for a few days and do a few hikes to make all that time worth it.
Goat Peak
Distance: 3.7 mi round trip | Elevation gain: 1400 ft | Drive time from Seattle: 4:15 hrs | Pass required: Northwest Forest Pass | Difficulty: Medium
Have I done it: No
Larches and a fire lookout! Sign me up! The trail is pretty much straight up, but the views from the top are incredible. I mean, that is why they put a lookout there. So you can see everything.
Because of the distance to this hike, you probably want to stay somewhere near this. You can camp or staying in Mazama is awesome. Get the french bread from the Mazama Store. It’s absolutely delicious.

Carne Mountain
Distance: 7.3 mi round trip | Elevation gain: 3600 ft | Drive time from Seattle: 3:15 hrs | Pass required: Northwest Forest Pass | Difficulty: Very Hard
Have I done it: No
Some serious vert at the end of the road. To some, that sounds like hell. To crazy people (like me), that sounds like the best kind of adventure. Once you get up into the alpine, there are lots of ridges and beautiful larches to be found. Most folks do it as a loop.
The road to this hike is notoriously bad. And the trailhead is basically at the end of the road. If you’re a master of pothole avoidance, you can do it in a sedan, but that probably isn’t advised. Also, plan for it to take longer to get out there.
Washington Pass Overlook
Distance: .25 mi round trip | Elevation gain: 61 ft | Drive time from Seattle: 3:15 hrs | Pass required: NA | Difficulty: Easy (ADA Accessible)
Have I done it: Yes
Whether you’re looking for a quick stop on the way through Highway 20 or want to have the glory of a larch view but a big hike isn’t in the cards right now, this is your option. This is a paved nature trail. There are guard rails near the cliffs and the views are absolutely incredible.
Pro tip: if you’re just driving by, stop. The view is so cool. Also, there are bathrooms.
Clara lakes
Distance: 3.2 mi round trip | Elevation gain: 900 ft | Drive time from Seattle: 3:20 hrs | Pass required: None | Difficulty: Easy/Medium
Have I done it: No
This is a great family hike, especially if you’re coming from Levanworth/Wenatchee. You park at Mission Ridge ski area and then can hike up to the lakes. It’s a fairly easy hike and there are plenty of beautiful larches surrounding the lakes.
The lake doesn’t seem to have much of a view beyond its own beauty. I don’t think there are epic views of mountains. I assume there are views on the trail, but it’s a pretty lake to hike to.
Swauk Discovery Trail
Distance: 2.2 mi round trip | Elevation gain: 660 ft | Drive time from Seattle: 2:00 hrs | Pass required: Northwest Forest Pass | Difficulty: Easy
Have I done it: No
We did it! We found an easy one! There will be fewer Larches than the most epic of hikes, but they’re there. If you’ve got littles or folks who aren’t quite up for Asgard Pass, this is a great option.
There was a burn in recent years in this area, so there are currently fewer Larches than desired. But, as we know, Larches grow faster than other trees at this altitude. So go spread some good vibes and hopefully, that’ll be yellow soon!

Basically anything else above 4000’ in the eastern North Cascades.
Here is the deal. There are about 100 more hikes to think about when it comes to larches. Do your research. You’ll find something magic. Maybe no one will be there. Maybe they will. But I like the hunt for good hikes. I spend a lot of time on the WTA site for well-tracked hikes, GAIA for not-so-well-tracked stuff and just Google Earth to find cool things.
Preserving larch habitats
Larches grow in fragile ecosystems. This should be an obvious statement, but let’s just say it again. Larches grow in fragile ecosystems. Be kind to them. If you’re hiking in an area that has a trail, STAY ON THE FREAKING TRAIL. If you’re in an area that doesn’t have a trail, then fan out and minimize your impact on the area. Please follow the principles of Leave No Trace.
- Plan ahead and prepare
- Travel and camp on durable surfaces
- Dispose of waste properly
- Leave what you find
- Minimize campfire impacts
- Campfires are illegal in many wilderness areas of WA and any time you’re above 5000’ above sea level. Basically, don’t have a campfire unless you’re saving your life.
- Respect wildlife
- Be considerate of others
Photography tips for great larch photos
Oooooh ooooh! Yes. This is the part where I shine! You’re talking to a photographer! Let’s chat about how to make good Larch photos.
Find your hero
You see larches, take a photo. It will look good. But, the best way to take a mediocre photo of everything is to find a hero. Is there one particular tree, rock, lake, or whatever to build your photo around? Find a way to craft that photo that personifies something and makes it the hero of your image.
Wide and tight photos
One of the tenets of good photojournalism is to make a wide, medium, and tight photo in each scene. If you’re using an iPhone with 3 lenses, this is pretty easy to do. Use each setting. You can easily create a varying view of the landscape by using the wide, normal, and tele options in your camera. A wide photo will help set the scene of the whole area. A tight photo could help isolate one particular area while a telephoto will help you identify a particular element. You can do all 3 of these without taking a step.
Low and high photos
Similarly, vary how you take photos. If you’re in the middle of a grove of Larches that stretches above your head, consider taking a photo from down below to accentuate the scale of this color and beauty. Or try holding the camera above your head to show both trees in the foreground and then see the valley beyond.
Show scale
Put people or known things in your photos. Obviously, you are going to take a selfie, but a good photo with a person can really help tell a fuller story. It’s also fun to use that tele lens from far away because will pull in the background and help make your subject look awesome with an epic wall of rock behind.
Post-production
You can do a lot with the native “edit” features on your phone. Turning up the saturation might help bring out all colors. You may also want to increase warmth to make those yellow trees a little more yellow.
If you have access to a more powerful tool like Lightroom or a variety of mobile editing tools, you may be able to isolate colors. I’d suggest increasing the saturation of the yellow and orange colors while decreasing the brightness of blue/teals. That will help create an image that will make those brights pop off the screen!

Essential gear for a larch hike
Honestly, this isn’t going to be too different from most shoulder season hikes. But, here is a good list. And remember that layers are our friends. Note, most links below are affiliate links.
- Shoes
- These days trail running shoes are quickly replacing hiking boots. I honestly don’t understand why anyone would wear boots unless you’re going into snow and need more protection. Boots offer minimal ankle protection and weight a ton. If I had ankle issues, I’d suggest running shoes and a brace instead of heavy boots almost every day.
- I wear Altra Lone Peak 5 with Injiji socks. These toe socks are magic.
- Pants or shorts
- Be comfortable. But be aware. Unless it’s really cold, I usually wear shorts or tights, but then pack a pair of sweats to put over if I think there is a chance of cold. But, that’s probably because I don’t own good hiking pants. IDK, I’ve just kinda never needed them. I either wear snow pants for skiing or shorts.
- Not cotton shirts
- Honestly, this should be a duh by now. If you’re going uphill, you’ll get sweaty. Wear a synthetic or merino shirt.
- Pro tip: bring a summit shirt. As soon as you get to the top, change your top. I sometimes even wear a cotton shirt *gasp* while hanging out at the summit. But get that wet gear off your body before your body temperature drops.
- Warm layer
- If it’s going to be cold, bring something to keep you warm. But, also remember that you will be hot going uphill and cold at the top. So, Be bold, start cold. Pack that puffy for when you take a break.
- If you are bringing a real down jacket, DON’T WEAR IT WHILE HIKING UPHILL UNLESS YOU REALLY NEED TO. Most true down will lose its loft when it gets wet. It will probably get wet from your sweat. Then, when you get to the top and you stop (again, your heart rate goes down, your body temp drops), your jacket will not do as good of a job keeping you warm.
- My favorite uphill is a synthetic t-shirt and then cycling arm warmers. My chest can easily vent heat and then my cold noodly arms stay toasty.
- Wind/Rain layer
- Yea. Bring something. You’re in Washington. It rains sometimes. A good gore-tex or similar jacket is great. You can do some uphill in one of these if need a little warmth (open those pit zips). Then it’s easy to take off, put on a warm layer underneath, and then back over everything again.
- Backpack
- Duh. You aren’t just going to carry your summit beers in your hands like a baton in the Olympic 4×400.
- Water
- Yes. You want this. I’d suggest 1L per 90 min uphill. Also, there are lots of lakes, streams and tarns. So a light filter can make your life easier. I use this and it’s pretty great (affiliate link).
- Also, Nuuns are great. Tailwind is too sweet. Yellow Gatorade is still God-tier.
- Food
- Eat. Do it.
- My favorite is to make a frozen pizza the night before. I cut it into 1/4ths. Eat ¼ in the morning to the trailhead. ¼ on the way up. ¼ at the top and ¼ when I get back to the car.
- Optional: Summit beers, extra cameras, and friends.